
Technical standards use a dial indicator or feeler gauge to inspect (1) flatness of the upper needle plate: standard ≤ 0.05mm
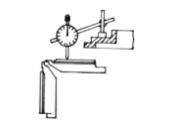
(2) Self-roundness of the upper needle disc: standard ≤ 0.05mm

(3) Self-roundness of the lower syringe: standard ≤ 0.05mm
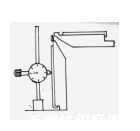
(4) Self-leveling of the lower syringe: standard ≤ 0.05mm
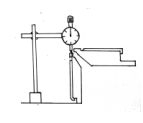
(5) The roundness of the upper needle disc and the lower needle cylinder: standard ≤ 0.05mm
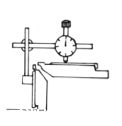
(6) The roundness of the upper needle disc and the lower needle cylinder: standard ≤ 0.05mm
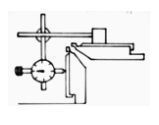
(7) The gap between the upper triangle and the syringe is 0.15mm-0.20mm. (8) The gap between the lower triangle and the syringe is 0.15mm-0.20mm
To ensure the machine is used more safely and efficiently, the following checks and primary adjustments should be made before the machine is put into use.(1) Motor drive check After connecting the power supply, please be sure to immediately check the drive direction of the motor. If the drive direction of the motor is different from the direction indicated on the label on the motor housing, the wiring of the motor must be changed immediately (just adjust two of the three phases in the motor junction box).(2) Inspection and adjustment of the motor drive belt Before starting the machine, please check the tension of the motor drive belt. Apply a pressure of 1 to 1.8kg in the middle section of the belt. At this time, the linear deformation of the belt should not exceed 3.5mm. If it is too loose or too tight, it should be adjusted immediately until the requirements are met. The adjustment method is as follows: Loosen the fixing screws of the motor base, move the motor outward or inward, and then tighten the screws after adjusting to the required tension. Note: After the initial three days of operation, a recheck should be conducted. Thereafter, an inspection should be carried out every three months
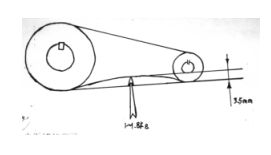
(
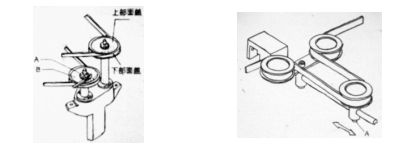
Adjustment of the dust-blowing system: The fan of the dust-blowing system should be specifically adjusted to ensure it is in the optimal position, so that when it is powered on and rotates, it can blow to every corner of the incoming yarn.(4) Adjustment of the yarn feeding drive system A Fine-tuning of the yarn feeding aluminum disc Adjusting the diameter of the yarn feeding aluminum disc can fine-tune the transmission speed ratio and change the yarn feeding volume. The adjustment method is as follows: First, loosen the round nut on the top of the yarn feeding aluminum reel with a wrench. When the upper cover is rotated in the “+” direction, the 12 sliders inside the aluminum disc will expand outward, increasing the diameter of the wheel body and thus increasing the yarn intake. Conversely, when rotated in the “-” direction, the sliders will retract inward, the wheel diameter will decrease, and the yarn intake will also decrease. During the rotation of the face cover, it should be firmly kept parallel; otherwise, the slider may fall out of the groove. The adjustable diameter range of the aluminum disc for yarn feeding is 70mm-200mm. After adjusting the aluminum disc, retighten the round nut. After making minor adjustments to the yarn feeding aluminum disc, the tension of the yarn feeding drive belt should be adjusted accordingly. If the tension adjustment of the B yarn feeding drive belt is too loose, the yarn storage device will slip and stop rotating, affecting yarn feeding. Therefore, before starting the machine, the following adjustments should be made to the yarn feeding drive belt: Loosen the fixing screws of the rollers and pull the rollers outward along the sliding rod. At this time, it should be ensured that the belt is evenly stressed on the entire yarn storage device. Lock the screw.
(5) Inspection of Grease lubrication: Check the lubrication conditions of the transmission system, fabric winding system and other parts. Replenish grease lubrication every day to prevent wear of machine parts due to lack of grease lubrication.